mirror of
https://github.com/cotes2020/chirpy-starter.git
synced 2025-04-21 11:53:27 +10:00
68 lines
3.3 KiB
Markdown
68 lines
3.3 KiB
Markdown
---
|
||
title: M1 Mac - How to Switch the Terminal between x86_64 and arm64
|
||
date: 2023-08-23 15:36:14
|
||
catagories: [macbook pro, mac m1, macOS, terminal]
|
||
tags: [terminal, macOS, M1]
|
||
---
|
||
|
||
## How to Switch the Terminal between x86_64 and arm64
|
||
https://vineethbharadwaj.medium.com/m1-mac-switching-terminal-between-x86-64-and-arm64-e45f324184d9
|
||
|
||
Here is a simple writeup on how I switch between x86_64 and arm64 in the Terminal app on my MacBook Pro with Apple Silicon.
|
||
|
||
So you have the new Mac with Apple Silicon. However, a lot of your projects are compiled in x86 and/or you are still building apps for x86, or whatever it is, you still want to compile the x86_64 code on your new Mac in the Terminal. You know it is possible with the Rosetta 2 (personally love it!). But how do you do it efficiently?
|
||
|
||
While there are many ways of doing it, the following is the best one I have found to easily switch between the two architectures using just a simple Terminal command as below (actually hiding the command under an alias)..
|
||
|
||

|
||
|
||
switching efficiently between x86_64 and arm64 using created alias
|
||
|
||
So let’s look at what’s behind it, and how you too can easily set it up!
|
||
|
||
The main command which does the magic is the one below:
|
||
|
||
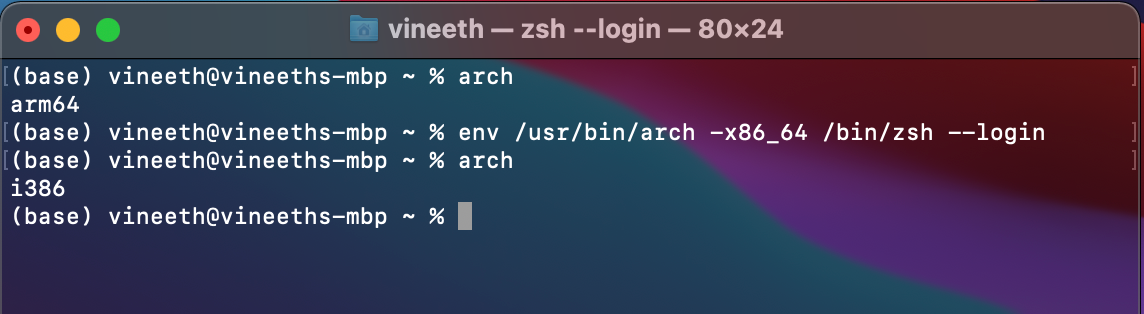
$env /usr/bin/arch -<architecture> /bin/zsh --login
|
||
|
||
… just replace the _<architecture>_ with your preferred one..
|
||
|
||
**For example:**
|
||
|
||
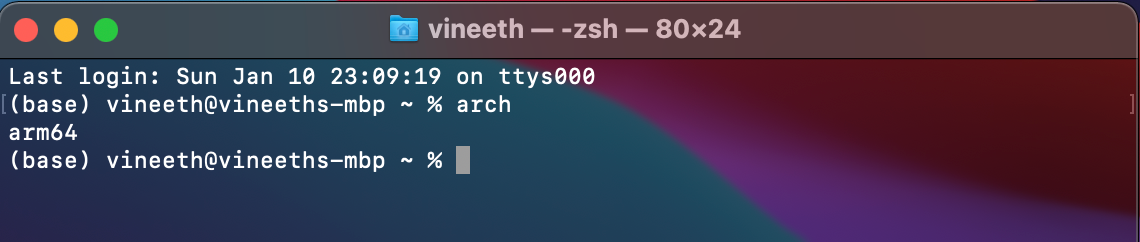
- To see your current architecture, type:
|
||
|
||
$arch
|
||
|
||
|
||
|
||
see current architecture the Terminal is using
|
||
|
||
As we see in the image above, I am currently using arm64, hence any code I compile will be for this architecture.
|
||
|
||
- To switch to x86_64, type:
|
||
|
||
==$env /usr/bin/arch -x86_64 /bin/zsh —-login==
|
||
|
||
Now if you type the arch command again, you will see that the target architecture has been changed. Now you can go ahead and compile your code using Rosetta 2 for the x86_64 architecture.
|
||
|
||
|
||
|
||
# Creating alias in .zshrc:
|
||
|
||
I don’t want to remember the whole command and type it all the time (obviously it’s not efficient). The simplest solution is to create an alias to it in the _.zshrc_
|
||
|
||
Just _cd_ into your home directory and open the .zshrc file.. If you don’t have one, you can easily create it using the _touch_ command. (If you don’t know about it, there are already plenty of tutorials/write-ups online)..
|
||
|
||
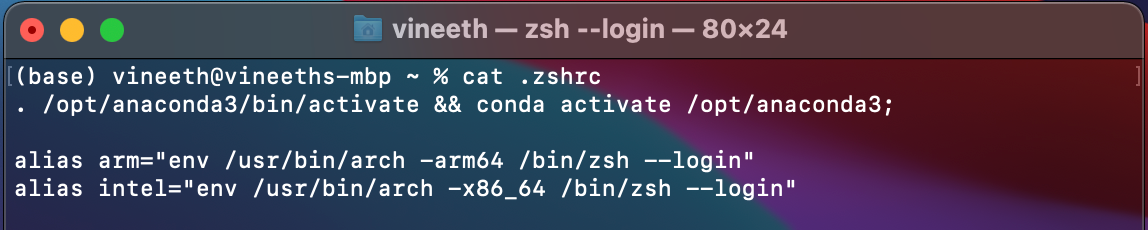
Here’s how my _.zshrc_ file looks like.. I have named my aliases arm and intel for the arm and x86_64 architectures respectively. You can name your aliases whatever you want. Just remember to relaunch the Terminal after updating and saving the _.zshrc_ file.
|
||
|
||
|
||
|
||
adding alias to .zshrc
|
||
|
||
Ignoring the first line, you can see the two alias I have created for arm and intel. To switch, I just need to type the alias and that’s it!
|
||
|
||
# **Bonus:**
|
||
|
||
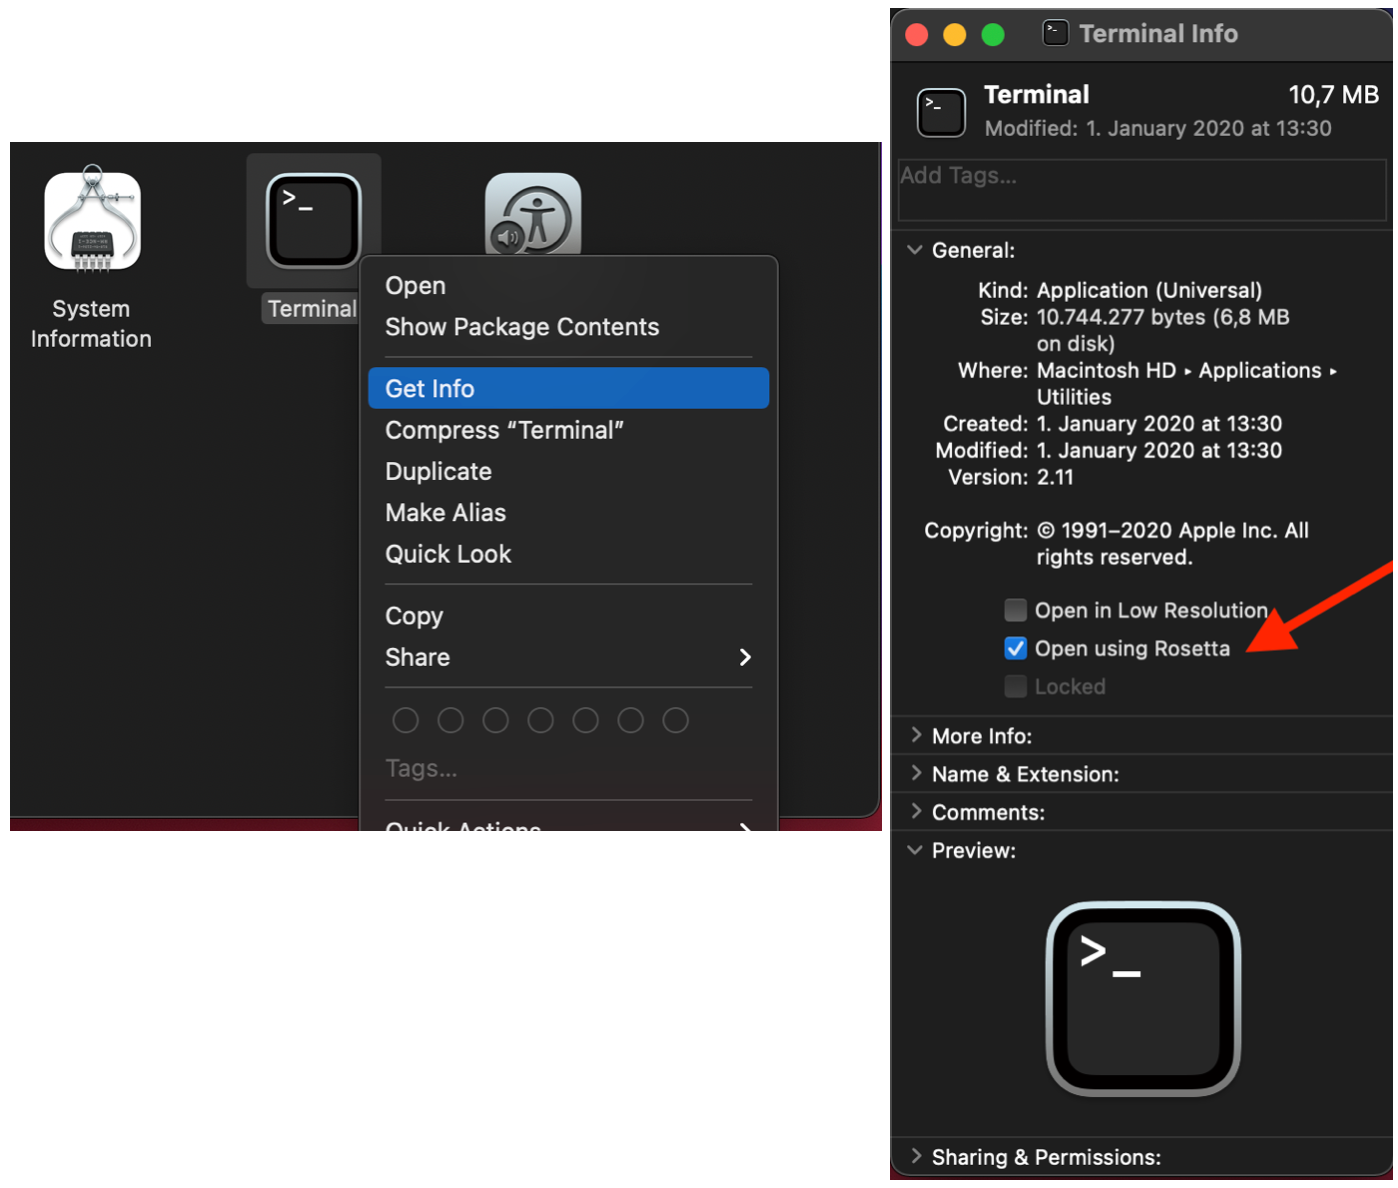
If you only want to use the Terminal app with Rosetta 2 for the x86_64 architecture, you can simple right click on the Terminal app in the _Applications>Utilities_, go the _‘Get Info’ and tick on “Open using Rosetta”_
|
||
|
||
|