mirror of
https://github.com/cotes2020/chirpy-starter.git
synced 2025-10-15 18:34:39 +10:00
261 lines
24 KiB
Markdown
261 lines
24 KiB
Markdown
---
|
||
title: Building a Custom Malware Analysis Lab Enviornment
|
||
date: 02023-08-23 15:33:46
|
||
catagories: [malware, cybersecurity]
|
||
tags: [cybersecurity, Red Teaming]
|
||
---
|
||
|
||
```ad-note
|
||
https://www.sentinelone.com/labs/building-a-custom-malware-analysis-lab-environment/
|
||
```
|
||
|
||
## Introduction
|
||
|
||
Building the right [malware analysis](https://www.sentinelone.com/cybersecurity-101/malware-analysis/) environment is the first step for every malware researcher. When all system configurations and software installations are complete, you’re able to analyze and investigate malware properly. In this post, I wanted to share my own experiences and scripts to help ease the workload of setting up a malware environment to explore malicious software.
|
||
|
||
In this post, you will learn how to:
|
||
|
||
1. download, install and configure a free Windows 10 and a free REMnux Linux virtual machine
|
||
2. set up a virtual private network for communication between virtual machines
|
||
3. build a custom Windows malware environment with SentinelLabs RevCore Tools
|
||
4. learn how to capture network traffic from a Windows 10 virtual machine
|
||
|
||
## Installing Virtual Machines
|
||
|
||
When running multiple virtual machines, the host operating system will begin slowing down, so it is critical to set each virtual machine’s best requirements to optimize its performance. To set up the virtual machines in this post, I recommend that the Windows 10 virtual machine be set with the minimum requirements of two processor cores with 4GB of RAM and the Linux virtual machine with two processor cores with 2GB of RAM.
|
||
|
||
## Downloading a Free Windows 10 Installation
|
||
|
||
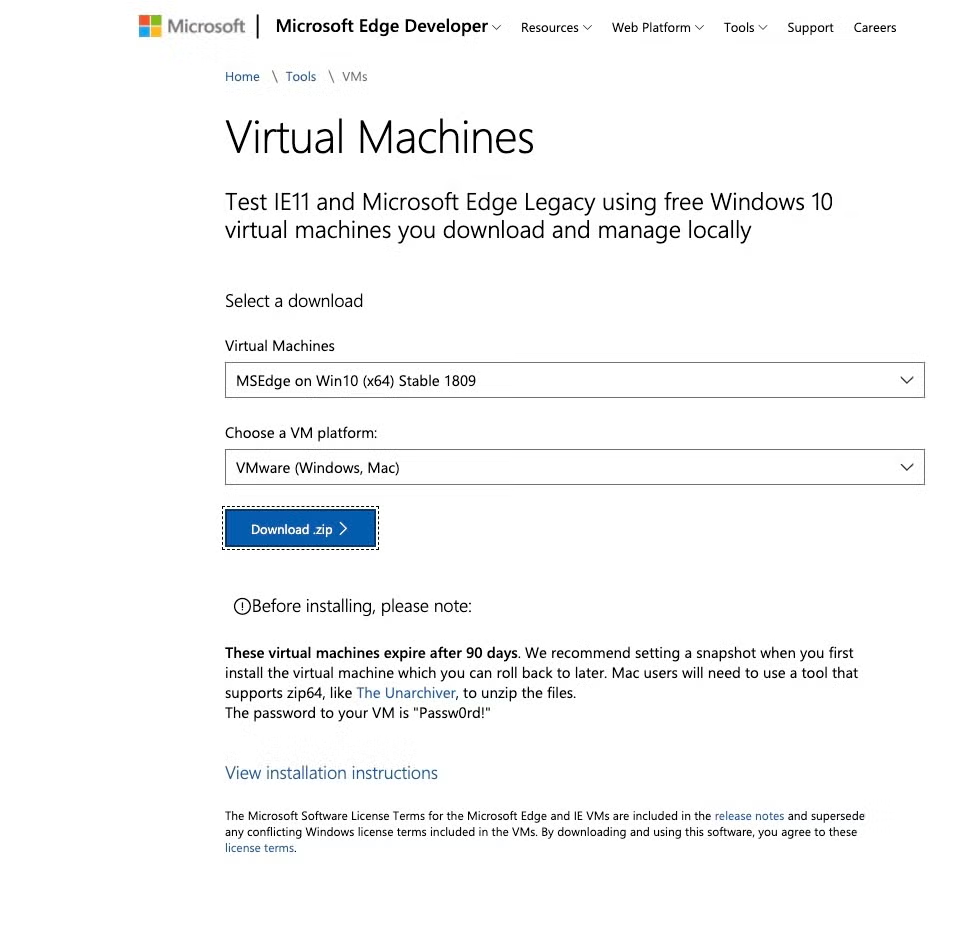
Microsoft provides a free virtual machine which is intended for testing IE and Edge web browsers. To download the Microsoft virtual machine go to [https://developer.microsoft.com/en-us/microsoft-edge/tools/vms/](https://developer.microsoft.com/en-us/microsoft-edge/tools/vms/) and download the MSEdge on Windows 10 zip file and select your preferred VM platform, currently I’m using VM Fusion.
|
||
|
||
|
||
|
||
## Downloading REMnux Linux
|
||
|
||
The next virtual machine we want to download is REMnux Linux. The REMnux distro is a Linux distribution based on Ubuntu. It has excellent tools for exploring network interactions for behavioral analysis and investigating system-level interactions of malware. To download REMnux go to [https://docs.remnux.org/install-distro/get-virtual-appliance](https://docs.remnux.org/install-distro/get-virtual-appliance) and download the Virtual Machine platform of your choice.
|
||
|
||

|
||
|
||
## Installing and Configuring a Private Isolated Custom Network
|
||
|
||
Creating an isolated, controlled network environment when analyzing malware is extremely important due to the level of interaction it gives you with malware. VMware Fusion gives you the capabilities to change key networking settings and add a virtual private network configuration to use for analysis between hosts. We will only add two virtual machines to this lab environment, but you can add many virtual machines to this network. The procedures to create this network is as follows:
|
||
|
||
- Select the tab **VMware Fusion->Preferences->Network**; click the lock icon to make changes
|
||
- Select the “**+**” button which creates a `vmnet#` under the **Custom** section.
|
||
- Do **_not_** select the _“Allow Virtual machines on this network to connect to external networks (using NAT)”_ option.
|
||
- Add a _Subnet IP_: I’ve entered `10.1.2.0`
|
||
- Click **Apply**
|
||
|
||

|
||
|
||
## Windows 10 Setup
|
||
|
||
Once you’ve created a custom network and both virtual machines have been downloaded, begin by unzipping the MSEdge Windows 10. Since I’m using VMware Fusion, I will go through how to import the virtual image; the process for importing the virtual machine with other platforms is similar.
|
||
|
||
Open up VMware Fusion and follow these steps:
|
||
|
||
1. After the zip has been unpacked enter the MSEdge-Win10-VMware folder.
|
||
2. Select in VMware Fusion **File->Import MSEdge_Win10_VMware**, hit **Continue** and save the Virtual Machine; it will take a few minutes to import the image.
|
||
3. Click on **Customize Settings** after the image has been imported.
|
||
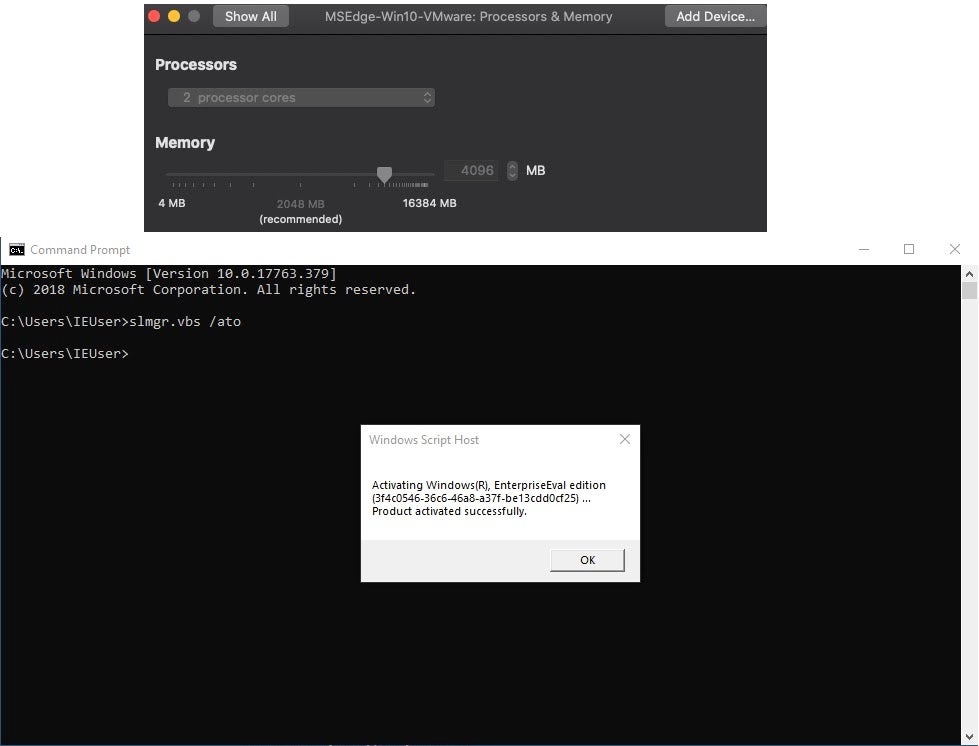
4. Click into the **Processors & Memory** tab and confirm that the settings has two processor cores and the memory is 4096MB.
|
||
5. Before powering on the MSEdge Win10 virtual machine, take a snapshot and name it something like “VM Clean Import”.
|
||
6. When starting the virtual machine, if prompted to upgrade the virtual machine to greater feature compatibility support, choose **Upgrade**.
|
||
7. The password to the virtual machine is `Passw0rd!`
|
||
8. Open the command prompt to activate the virtual machine, type `slmgr.vbs /ato`.
|
||
9. When prompted, install VMware’s “Virtual Tools” and reboot.
|
||
10. Once the virtual machine has rebooted, complete login and immediately take a snapshot. Give it a descriptive name, such as “Activation and VM Tools Install” snapshot.
|
||
|
||
|
||
|
||
## REMnux Setup
|
||
|
||
The REMnux virtual machine downloads as an `.ova` file. I recommend you browse to [docs.REMnux.org](https://docs.remnux.org/install-distro/get-virtual-appliance) to confirm the hash of the downloaded OVA file.
|
||
|
||

|
||
|
||
If you are using VirtualBox, you can just import REMnux, but if you are using VMware Fusion or VMware Workstation, follow these instructions to import the REMnux:
|
||
|
||
1. Select **File->Import->Choose File…** and select _remnux-v7_, hit **Continue** and then **Save**.
|
||
2. When the import is complete, click on **Customize Settings**.
|
||
3. Click into the **Processors & Memory** pane under _System Settings_ and leave the settings with two processor cores; reduce the memory from 4096MB to 2048MB.
|
||
4. For the REMnux network configuration, the setup is slightly different. We want to add an additional network adapter._Note_: There are multiple reasons why I configure this virtual machine this way. If I need to update or download other software having the network adapter configured saves me time; the second is if I want to allow malware callouts.Once the import is complete and you’re in the “Settings” menu, select **Network Adapter**. The next step is to click **Add Device…** and select **Network Adapter** and **Add…**. Make sure the _Share with my Mac_ radio button is set. Return to the main “Settings” panel and select **Network Adapter 2**. Click the _vmnet2_ radio button, then choose **Show All** to go back to Settings.
|
||
5. When starting the REMnux virtual machine, if prompted to upgrade the virtual machine to greater feature compatibility support, choose **Upgrade**.
|
||
6. Once REMnux boots, the credentials are: Username: `remnux` Password: `malware`.
|
||
7. I always change the password on my virtual machines:
|
||
1. $passwd
|
||
UNIX password: malware
|
||
Enter new UNIX password: (your choice)
|
||
|
||
8. The next step is to configure the network settings. If you type `ifconfig -a` you should see two network adapters:
|
||
1. Select NAT for the first network adapter. The virtual machine will get an address on that network from the VMware virtual DHCP server. You can ping google to see if you have connectivity or open the Firefox browser and connect to any website to confirm that you have internet access. If you do not, then type this command in terminal: `$ sudo dhclient -r` This should allow you to fetch an IP.
|
||
2. For the second adapter, ens37, type in this command:`$ sudo ifconfig ens37 10.1.2.1 netmask 255.255.255.0`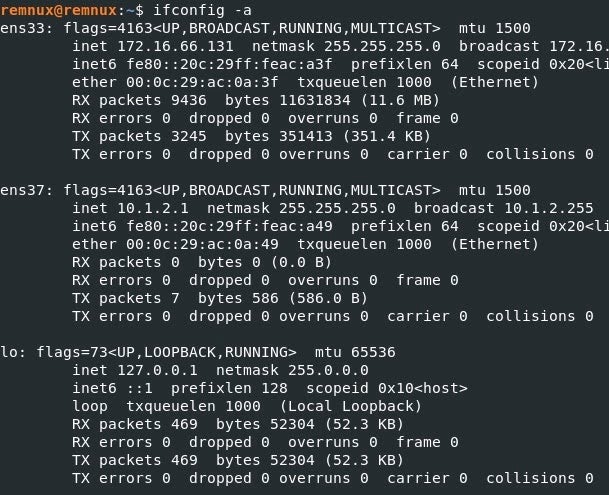
|
||
9. Hit the “Snapshot” button and name it something like “Clean Snapshot”.
|
||
10. Update and upgrade REMnux:`$ sudo apt-get update; sudo apt-get upgrade`
|
||
|
||
## Installing SentinelLabs RevCore Tools
|
||
|
||
One of the reasons I wanted to create a SentinelLabs VM Bare Bones malware analysis toolkit was that when installing FlareVM, I find it contains many tools that I do not use, and it takes a minimum of 40 minutes to install. I wanted to create a script of the core tools and system configurations that I need to be able to analyze malware.
|
||
|
||
Follow this procedure to instal SentinelLabs RevCore Tools on MSEdge WIndows 10:
|
||
|
||
1. Browse to the [SentinelLabs RevCore Tools](https://github.com/SentineLabs/SentinelLabs_RevCore_Tools) github page and download the zip.
|
||
2. Unzip it and drag the `SentinelLabs_RevCore_Tools_codeSnippet.ps1` script onto your desktop.
|
||
3. If you are using the free downloaded Windows 10 virtual machine that I’ve mentioned above go to Step 4; if you are using your own Windows virtual machine continue with these substeps:
|
||
1. Instead of dragging just the `SentinelLabs_RevCore_Tools_codeSnippet.ps1`, drag the entire folder onto your virtual machine desktop.
|
||
2. Open the `SentinelLabs_RevCore_Tools_codeSnpippet.ps1` file and modify line 4 after `-PackageName.` You will modify the url and change it to the directory location on your desktop. E.g., `'https://raw.githubusercontent.com/SentineLabs/SentinelLabs_RevCore_Tools/master/SentinelLabs_RevCore_Tools.ps1'` to `'c:UsersyourUsernameDesktopSentinelLabs_RevCore_Tools-mainSentinelLabRevCoreTools.ps1'``;`
|
||
3. The final thing to do is to modify the `SentinelLabsRevCoreTools.ps1.` On lines 105-117, replace `IEUser` with the User profiles name you are using. Save all files and run the script. E.g.,
|
||
|
||
Install-ChocolateyShortcut -ShortcutFilePath "C:\Users\IEUser\Desktop\HxD.lnk" -TargetPath "C:\Program Files\HxD\HxD.exe"
|
||
|
||
Install-ChocolateyShortcut -ShortcutFilePath "C:\Users\YourUser Profile\Desktop\HxD.lnk" -TargetPath "C:\Program Files\HxD\HxD.exe"
|
||
|
||
4. Go to Step 5.
|
||
4. In the Windows 10 search bar, type `powershell`, right click and run as administrator. Browse to the location of the `SentinelLabs_RevCore_Tools_codeSnippet.ps1` powershell script, then run the script:
|
||
`.SentinelLabs_RevCore_Tools_codeSnippet.ps1`.
|
||
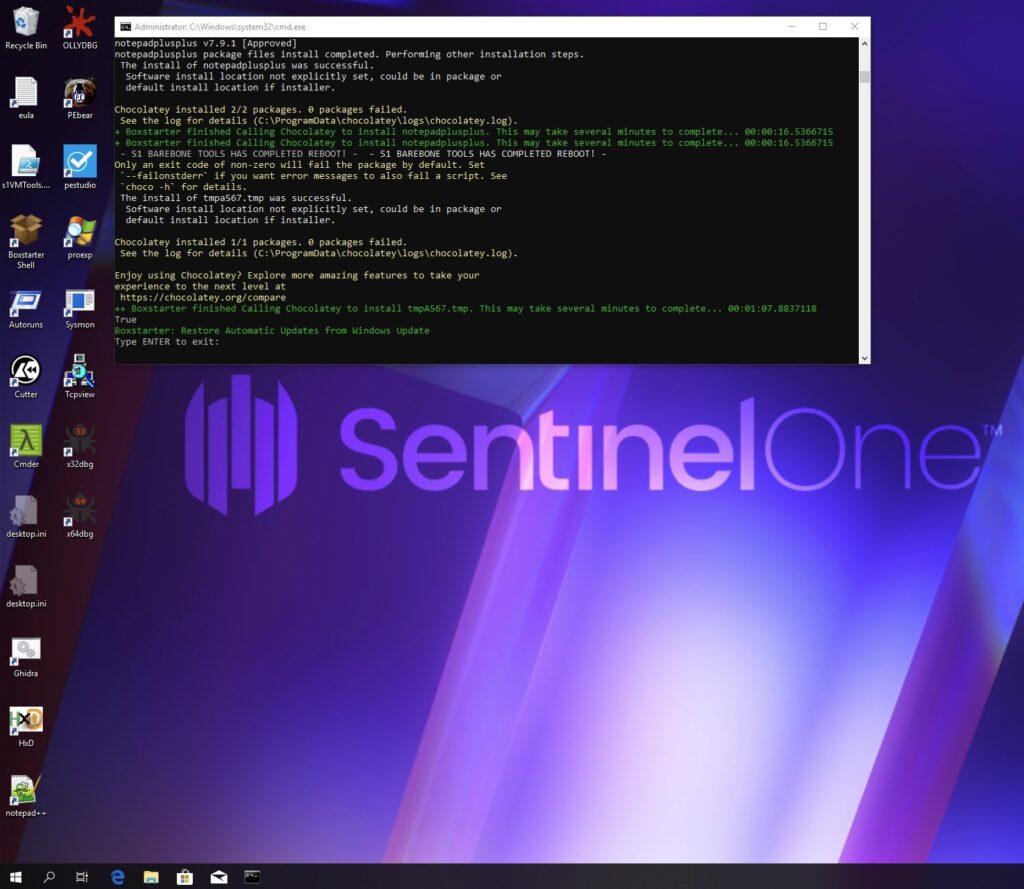
5. The script will cause two automatic reboots, and you’ll need to log in again with your user password after each. The first reboot will continue disabling various system services that could otherwise hinder your malware analysis and continue to install the core tools. After the second reboot, the script will finalize and confirm all of the configurations and installations.The installed tools and modified system configurations are listed below. Don’t forget to take a snapshot when it’s finished and you’ve reached the “Type ENTER to exit” point.
|
||
|
||
1. **Tools:**
|
||
Checksum, 7zip, Process Explorer, Autoruns, TCPview, Sysmon, HxD, PEbear, PEStudio, PEsieve, Cmder, NXlog, X64dbg, X32dbg, Ollydbg, IDA-Free, Cutter, Ghidra, Openjdk11, Python3, PIP, PIP pefile, PIP YaraA tool that I frequently use is [Hiew](http://www.hiew.ru/), Chocolatey does not have Hiew in its collection. My recommendation is to download and try out the free version, once you see the power of Hiew you should definitely purchase lifetime access because it is worth every penny.
|
||
2. **System Configuration:**
|
||
Disabling – Bing Search, Game Bar Tips, Computer Restore, UAC, Update, Firewall, Windows Defender, Action Center
|
||
Set Window Theme, Set Wallpaper, Create Shortcuts For Tools
|
||
|
||
|
||
|
||
|
||
|
||
## Network Traffic Collection
|
||
|
||
When analyzing malware, often the malware operation and the C2s are still active, so an excellent way to stay under the radar is to run malware in a controlled environment. Analyzing network traffic is a trivial process in detecting malicious software callouts in real time network traffic. This section will help you configure your virtual machines to capture the detonated malicious software’s network traffic or statically step through debugged code, which allows your investigation to understand the potential threat at hand.
|
||
|
||
The first thing that must be configured is the virtual private network communication between the MSEdge Windows 10 and REMnux:
|
||
|
||
1. On the Windows 10 virtual machine, select the custom `vmnet2` network (**Virtual Machine->Network Adapter->Custom (vmnet2)**).
|
||
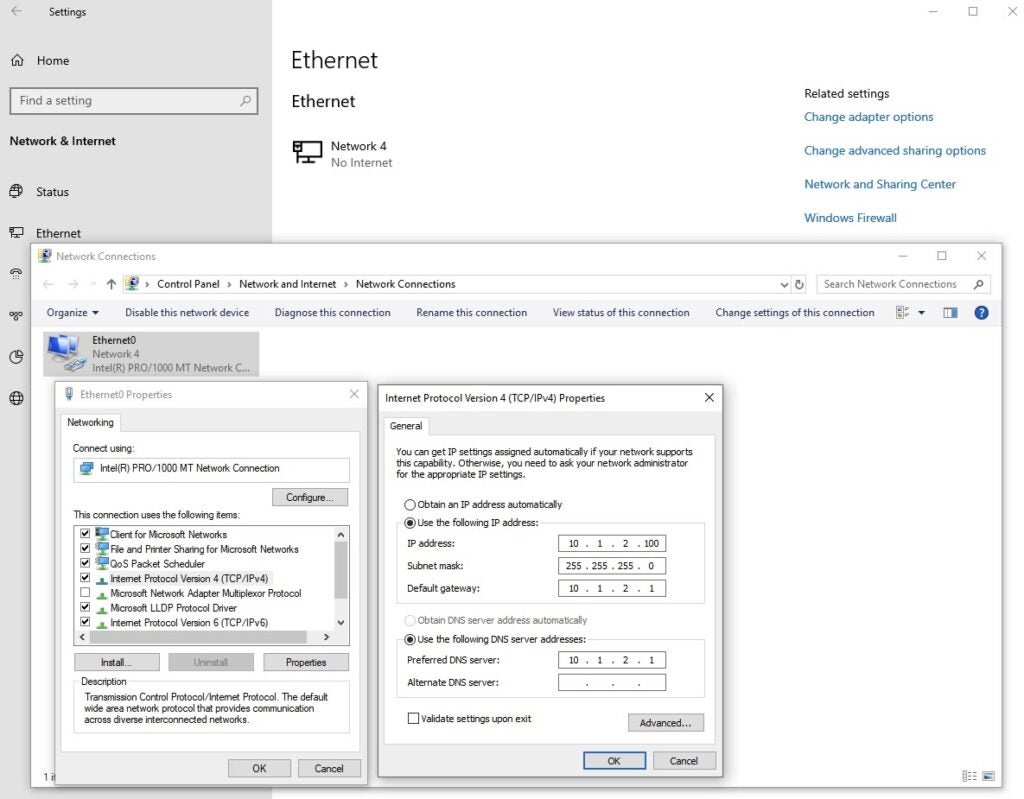
2. On the Windows 10 VM, right click on the network adapter in the taskbar and choose _Open Network & Internet settings_.
|
||
3. Select _Ethernet_ and click on **Change adapter options**.
|
||
4. Right click on _Ethernet0_ and select **Properties**.
|
||
5. Double click on _Internet Protocol Version 4 (TCP/IPv4)_.
|
||
6. Click the radio button to select “_Use the following IP address:_”, then add the IP address, Subnet mask, Default gateway, and Preferred DNS server as follows:
|
||
1. IP Address: 10.1.2.100
|
||
2. Subnet mask: 255.255.255.0
|
||
3. Default Gateway: 10.1.2.1
|
||
4. Click the radio button to select _“Use the following DNS server address:”_ and add:
|
||
- Preferred DNS Server: 10.1.2.1
|
||
5. Click **OK** to complete configuration of the network settings.
|
||
|
||
|
||
|
||
The REMnux adapter for the virtual private network has already been configured from the previous section.
|
||
|
||
Now that the virtual machines are networked and can communicate with each other, it is time to configure a few tools on the REMnux virtual machine to capture traffic.
|
||
|
||
Installed on REMnux are various tools you can use to capture network traffic. We will configure Burp Suite and INetSim. Burp Suite is typically used to test web application firewalls, but in our case we want to configure it so that when Windows 10 detonates malware, it will try to establish a connection to a domain or C2. The traffic will potentially use HTTPS and pass through Burp Suite, which will be bound to INetSim. INetSim is a software suite that simulates common services for lab environments to analyze malware’s network behavior.
|
||
|
||
## Burp Suite Configuration
|
||
|
||
The Burp Suite setup is straightforward, but there are a couple of steps that we must configure before we can begin using it.
|
||
|
||
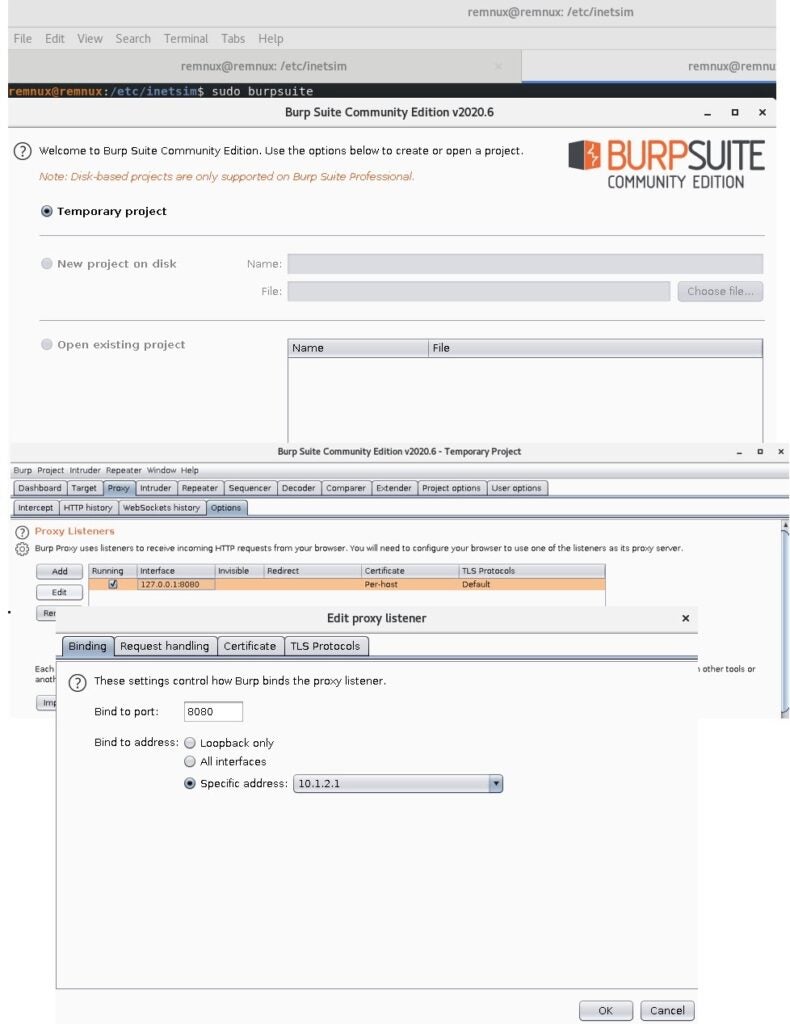
- Open a command prompt and type: `$ sudo Burp Suite`.
|
||
- select _Temporary project_, then hit **Next** and then **Start Burp**.
|
||
- Select the **Proxy** tab and then “Options”. Under _Proxy Listeners_, select the default interface and click the **Edit** button.
|
||
- Under the **Binding** tab, set _Bind to address_ to _Specific address: 10.1.2.1_ and click **OK**.
|
||
|
||
|
||
|
||
- IMPORTANT STEP:
|
||
- Go back to you MSEDGE Windows 10 virtual machine and open up the Edge browser.
|
||
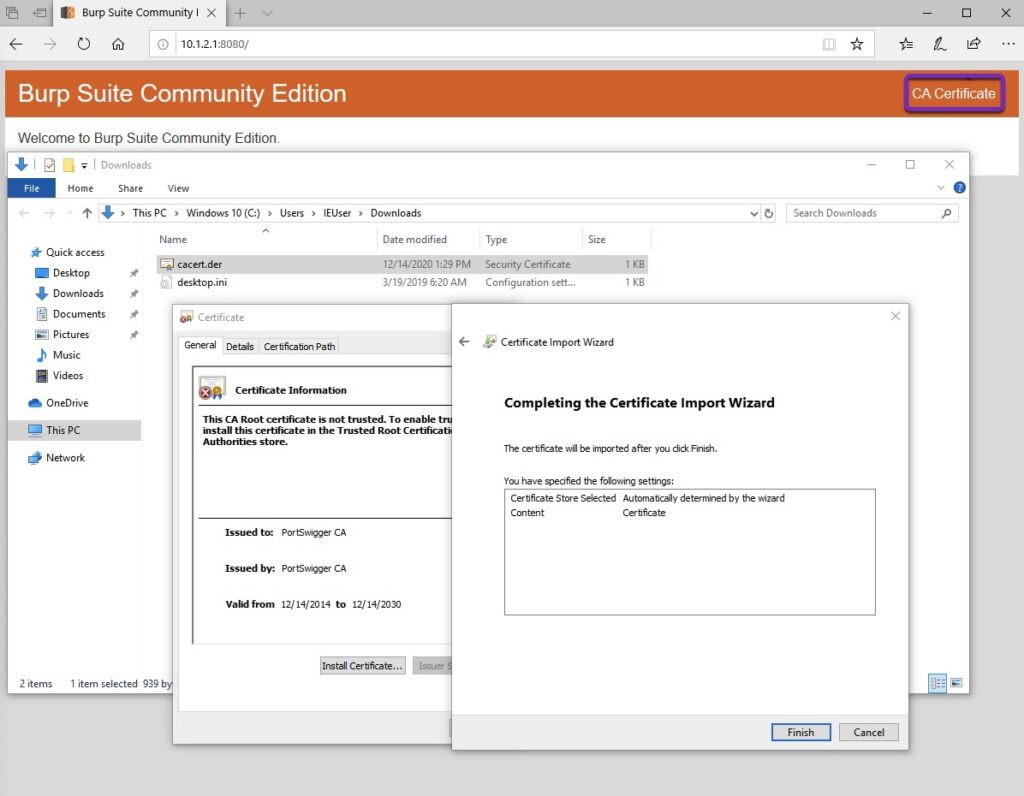
- Type in the address bar: [`http://10.1.2.1:8080`](http://10.1.2.1:8080/). You should see “Burp Suite Community Edition”.
|
||
- Download the CA Certificate on the top right side of the page.
|
||
- Open the location of the file and double click on the certificate file.
|
||
- Select `Install Certificate...`.
|
||
- Select `Current User` as the Store Location and click `Next`.
|
||
- Select `Automatically select the certificate store based on the type of certificate`. Click `Next` and then click `Finish`.
|
||
- Go into the settings of the EDGE Browser and disable all security functionalities; this will help with testing the connection to INetSim in the next section.
|
||
- Make sure you take a snapshot.
|
||
|
||
|
||
|
||
Go back to the REMnux virtual machine. You should still be in Burp Suite Proxy tab, _Edit proxy listener_ options.
|
||
|
||
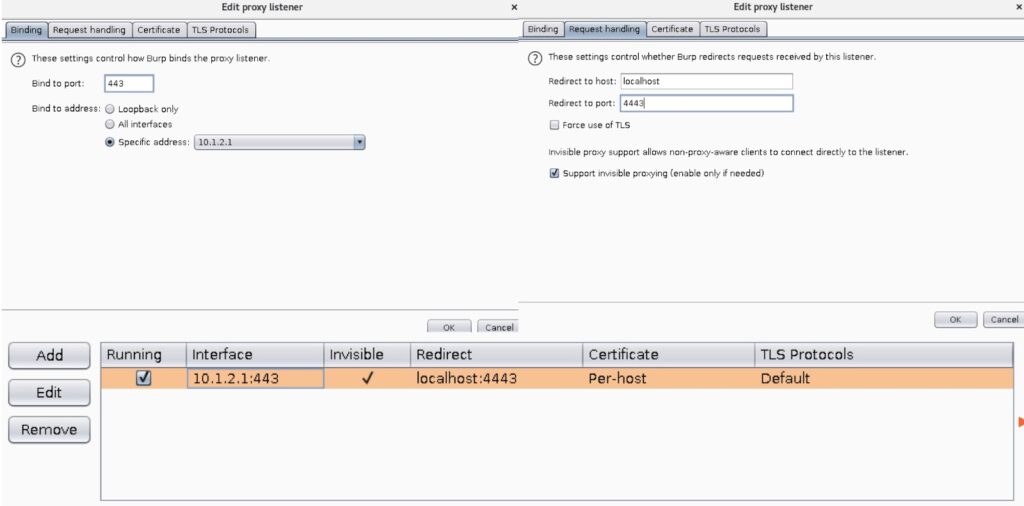
- Under the **Request handling** tab, set _Redirect to host_ to `localhost` and _Redirect to port_ to `4443`. Select _support for invisible proxying_.
|
||
- Now go to the **Intercept** tab and make sure _intercept_ is **off**.
|
||
- Under **Proxy Listeners**, select the default and click `Edit`
|
||
- Under the Binding tab, `Bind to address: Specific address: 10.1.2.1` should still be kept, but change the _Bind_ to port `443`
|
||
- Click on the **Request handling** tab and set the _Redirect to host_ option to `localhost` and `Redirect to port` to `4443.`
|
||
- Select the _Support invisible proxying (enable only if needed.)_ and click **OK**.
|
||
|
||
|
||
|
||
## INetSim Configuration Setup
|
||
|
||
REMnux has INetSim preinstalled. Use your favorite text editor and open up the `inetsim.conf` file located in `/etc/inetsim/`. Follow the steps to configure INetSim:
|
||
|
||
1. `$ sudo vi /etc/inetsim/inetsim.conf` and enable all the services by uncommenting out the services by deleting the `#` character._Pro Tip:_ Be aware that malware could potentially detect it is running in a virtual environment by checking whether everything in this file is uncommented. I have yet to come across this, but it is good to be aware of the possibility. You could take a more conservative approach and only uncomment services you intend to use.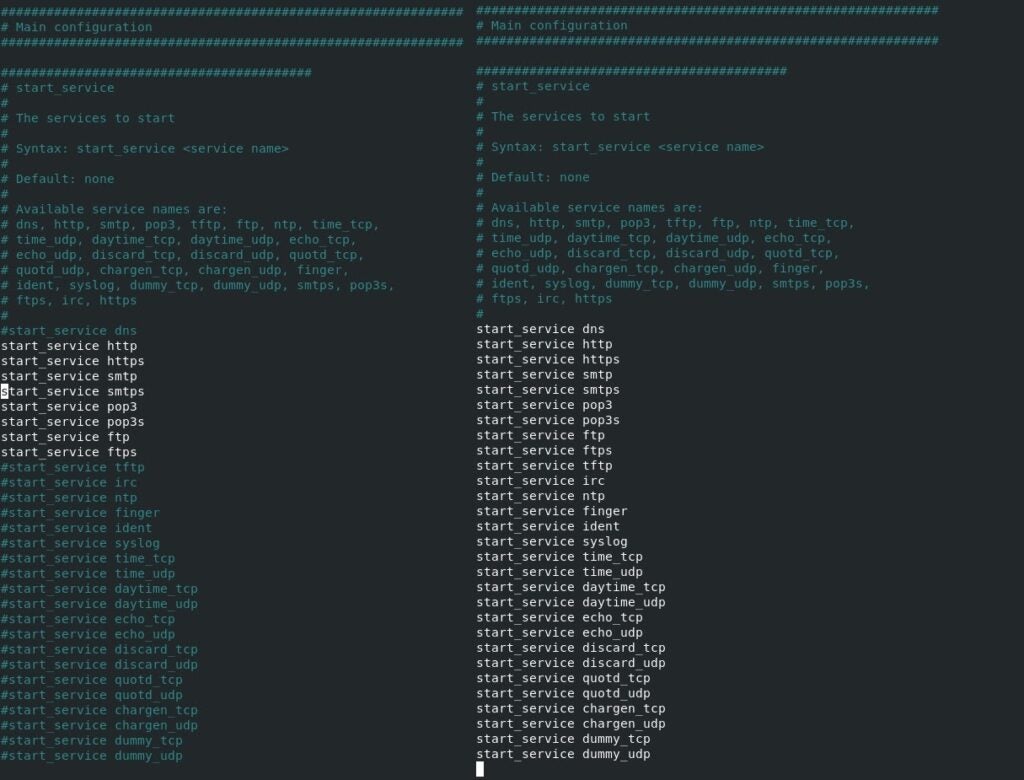
|
||
2. The next step is to bind the REMnux network adapter IP in the `inetsim.conf` file. The next section after the services menu is the `service_bind_address`. Uncomment the `#` and change the default IP address from 10.10.10.1 to `0.0.0.0`.
|
||
3. Scroll down to the `dns_default_ip` section, uncomment the `#` and change the IP address from 10.10.10.1 to `10.1.2.1`.
|
||
4. The last thing to do is to bind the HTTPS port so Burp Suite can route the traffic to the port 4443. Scroll down to the `https_bind_port` section, uncomment the `#` character and replace 443 with `4443`.
|
||
5. Save the changes and exit the editor.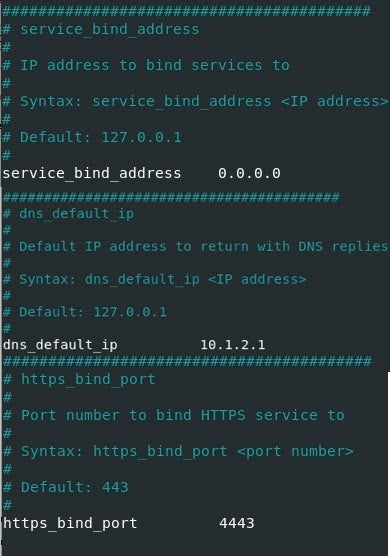
|
||
6. The next step is to run the following commands which are VERY IMPORTANT to execute or INetSim will not work correctly. Ubuntu has a system-resolved system service which provides network name resolution to local applications. This conflicts with INetSim so we need to disable the service.We have to disable `system-resolve` and also mask it so that it doesn’t auto start on reboot. Finally, we will stop the service.
|
||
|
||
$ sudo systemctl disable systemd-resolved
|
||
$ sudo systemctl mask systemd-resolved
|
||
$ sudo systemctl stop systemd-resolved
|
||
|
||

|
||
|
||
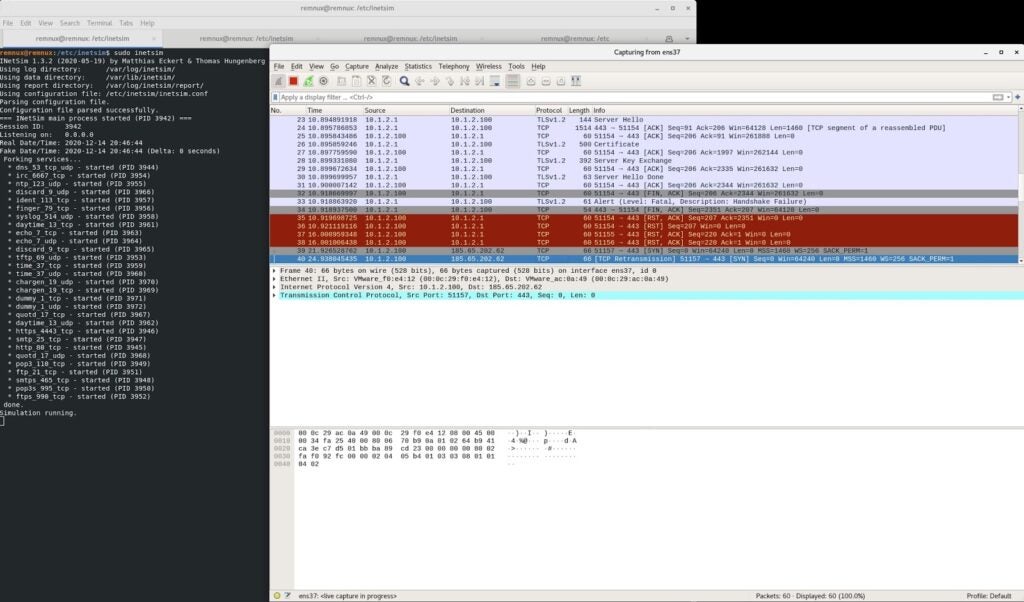
7. The final step is to run INetSim:
|
||
`$ sudo inetsim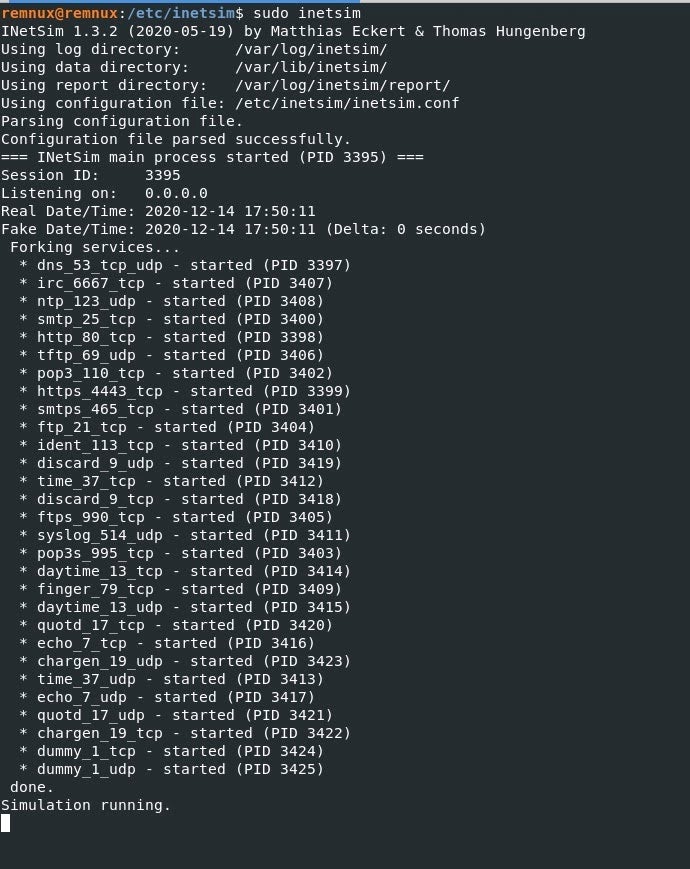`
|
||
|
||
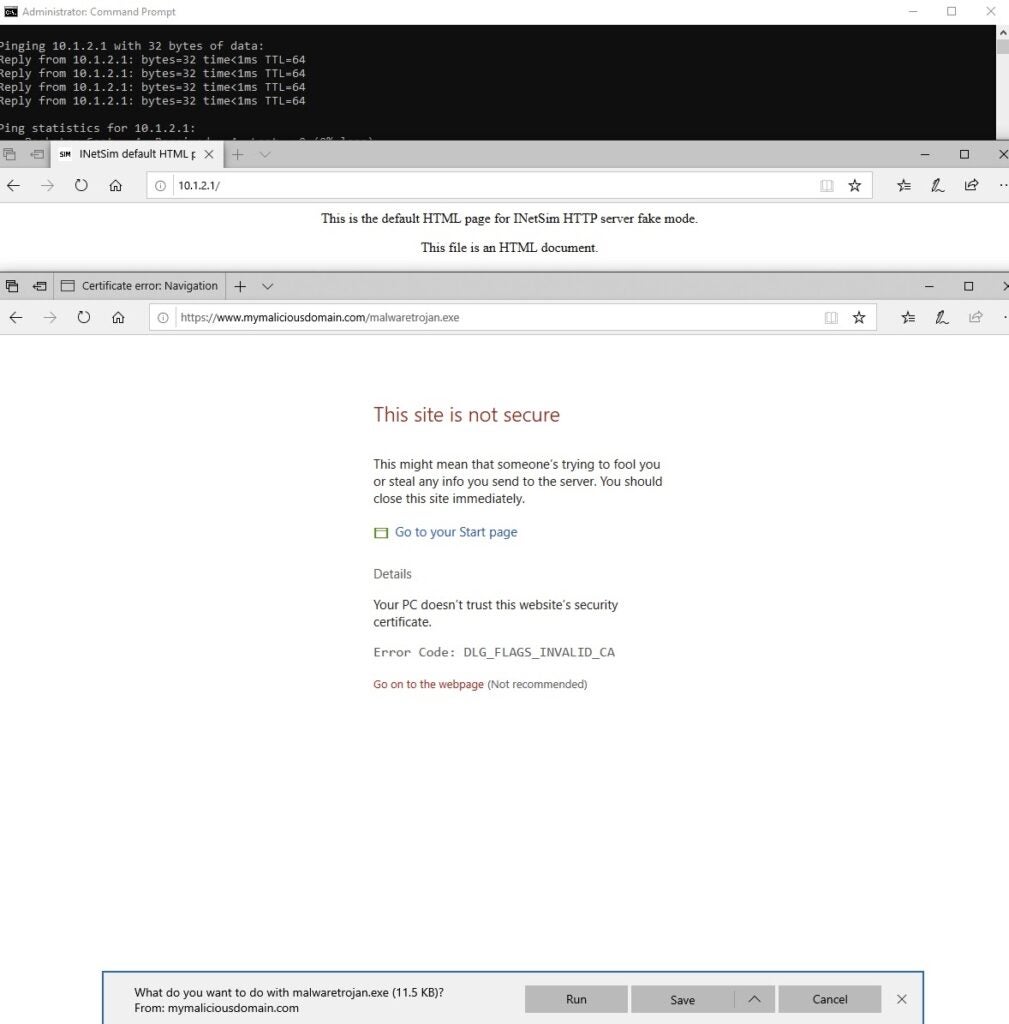
To test network connectivity from your Windows 10 virtual machine, open a command prompt and ping 10.1.2.1, then open Edge browser and type 10.1.2.1. You should see the following message “_This is the default HTML page for INetSim HTTP server fake mode._”
|
||
|
||
The final test is to make sure the DNS is working correctly and serving up requests. For this example, I type in the search bar `https://www.mymaliciousdomain.com/malwaretrojan.exe`. If everything is working, you should see a web page warning that the requested site is not secure.
|
||
|
||
|
||
|
||
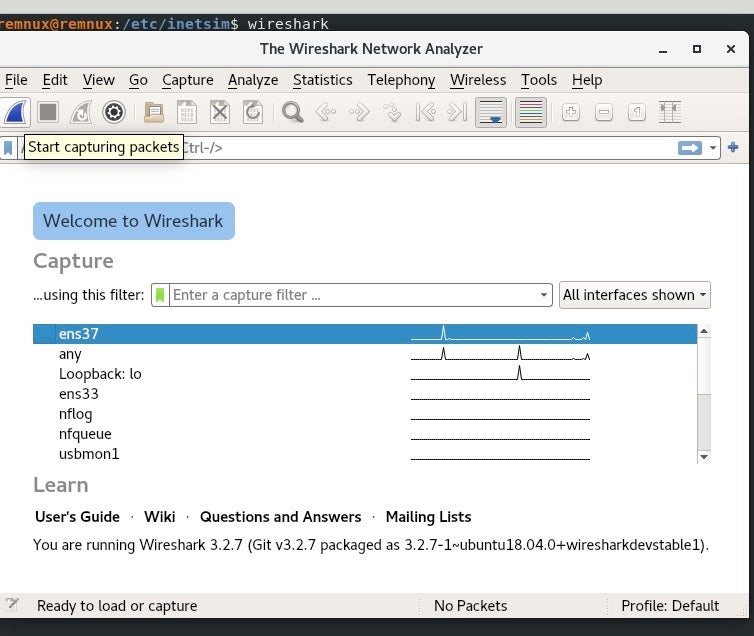
I also like using Wireshark to capture packets to analyze the pcaps when investigating malware.
|
||
|
||
Open a new tab in your terminal in REMnux and type `$ wireshark`.
|
||
|
||
Once the application has opened, click on the shark fin icon on the far left of the toolbar to begin capturing packets.
|
||
|
||
|
||
|
||
## Detonating Malware
|
||
|
||
When malware is executed, it usually makes some request to a domain or IP address. INetSim helps with this by spoofing the responses to the malware that is waiting for a response. An example would be if malware was executed and reached out to a domain and will not proceed without a response unless the conditions were met, which is the response. If the malware doesn’t receive the response, it would terminate and not continue its malicious actions. This is where the live environment assists us with responding to callouts and capturing network traffic.
|
||
|
||
For the final step of the lab environment setup, we will detonate a notorious binary trojan (or any malware you choose) to test the configuration is working correctly.
|
||
|
||
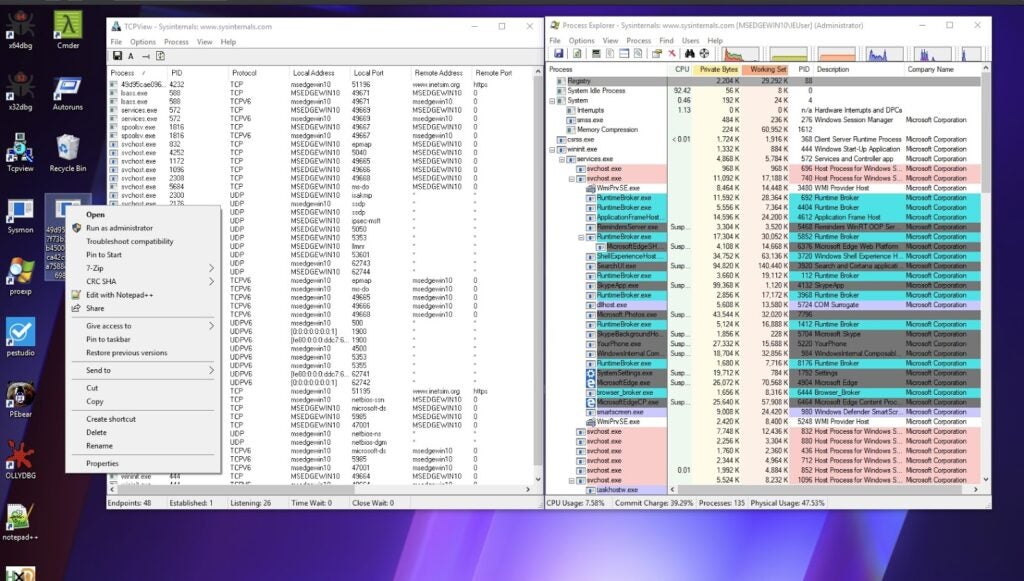
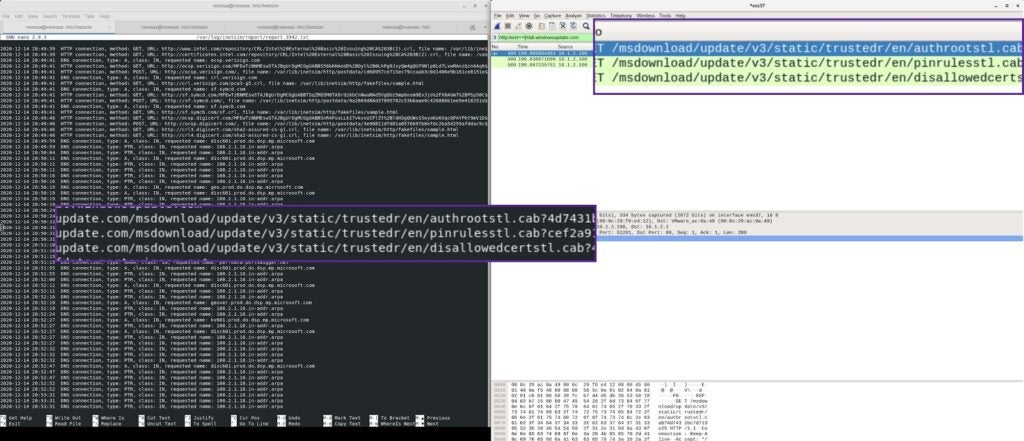
I’m testing with a Trickbot binary (**SHA256:** `49d95cae096f7f73b3539568b450076227b4ca42c0240044a7588ddc1f1b6985`). I’ve opened Process Explorer and TCPView to monitor the execution of this variant of Trickbot.
|
||
|
||
|
||
|
||
|
||
|
||
Detonating malware can save a lot of time before diving deep into reverse engineering as it allows you to gather insight and create an unbiased hypothesis. In this example, when we detonated this trickbot sample there were three callouts that stuck out:
|
||
|
||
- The callouts were to fetch files from Microsoft Updates site; these cab files called were automatic updaters of untrusted certificates. A certificate trust list is a predefined list of items signed by a trusted entity. These requested cab files are used to update and expand the existing functionality by adding known untrusted certificates to the untrusted certificate store by using a certificate trust list.
|
||
|
||
|
||
|
||
Although Trickbot is one of the more prolific malware strains today and is more complex than a few callouts, it is a good starting point if you are in the beginning stages of research and have never encountered this binary.
|
||
|
||
I’ve been successfully using this lab setup for many years. A real-world example of using this lab setup occurred when I was brought in to help with an incident at short notice back in 2016. I didn’t have time for an initial triage of the binary as I was joining a war room call for the briefing by the investigation team lead. I started both VMs from snapshots and detonated the binary while being brought up to speed about the incident. Within 5 minutes, I informed the investigation lead about an IP that the specific binary was calling out to, which was enough to give the threat hunters a place to begin. After the war room call, I started reversing the malware and extracting additional IOCs and TTPs.
|
||
|
||
## Conclusion
|
||
|
||
A lab environment setup and configuration varies during malware analysis. When analyzing malware you need different tools to dissect and do deep analysis. I hope the SentinelLabs RevCore Tools and configurations in this setup assists, but there might be a time that you need to analyze something different, like a dot net file, and may need an additional tool to fully disassemble the binary. The journey of reversing malware is a marathon and not a sprint; growing your skill and learning from every malware analyzed should be the goal.
|
||
|
||
## Resources
|
||
|
||
[https://support.microsoft.com/en-us/help/2677070/an-automatic-updater-of-untrusted-certificates-is-available-for-window](https://support.microsoft.com/en-us/help/2677070/an-automatic-updater-of-untrusted-certificates-is-available-for-window)
|
||
|
||
[https://askubuntu.com/questions/191226/dnsmasq-failed-to-create-listening-socket-for-port-53-address-already-in-use](https://askubuntu.com/questions/191226/dnsmasq-failed-to-create-listening-socket-for-port-53-address-already-in-use)
|
||
|
||
[https://gallery.technet.microsoft.com/scriptcenter/Change-the-Desktop-b5b2141c](https://gallery.technet.microsoft.com/scriptcenter/Change-the-Desktop-b5b2141c)
|
||
|
||
[https://gist.github.com/trietptm/b84ccad9db01f459ac7e](https://gist.github.com/trietptm/b84ccad9db01f459ac7e)
|
||
|
||
https://www.amazon.com/Building-Virtual-Machine-Labs-Hands/dp/1546932631
|
||
|